Use Case Analysis with Splunk
What is Splunk?
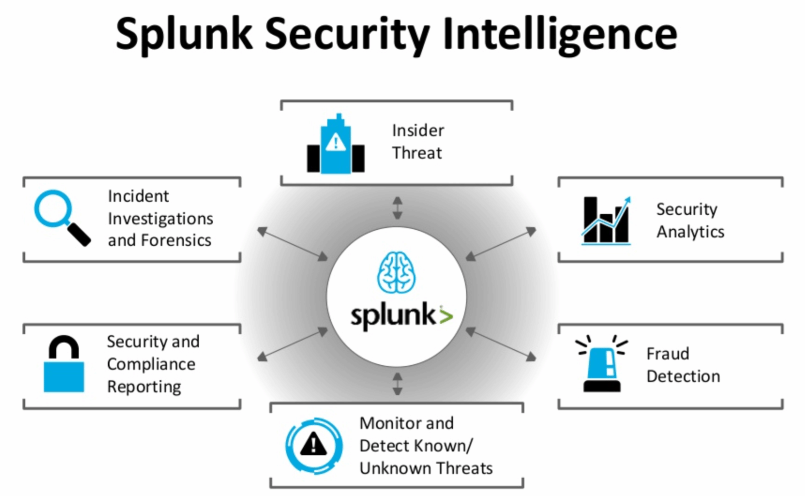
Splunk is a platform used to search, monitor, and analyze machine-generated data to detect threats, manage security incidents, and gain operational visibility across an organization’s IT infrastructure. It collects data from various sources, such as logs from servers, applications, and networks, and transforms it into searchable, actionable insights through dashboards, alerts, and reports.
How Splunk is used in cybersecurity
- Security monitoring: It captures and indexes real-time data from security devices and systems to monitor for suspicious activity.
- Threat detection: By correlating data from different sources, Splunk can automatically detect anomalies and potential security incidents that might be missed by traditional systems.
- Incident investigation: It provides a centralized location to search through logs and events to investigate security incidents, perform forensics, and understand the scope of an attack.
- Compliance reporting: Splunk can be used to generate reports to demonstrate compliance with various security regulations by analyzing and documenting security-relevant data.
- Alerting: It can be configured to trigger alerts when specific security events or patterns are detected, allowing security teams to respond quickly.
Key components and features
- Data ingestion: Gathers data from a wide variety of sources, including logs, network traffic, and API events.
- Indexing and searching: Indexes the data so it can be searched in real-time, even across massive datasets.
- Visualization: Transforms data into visual dashboards, reports, and graphs for easier understanding and analysis.
- Alerting: Automates the process of notifying teams when specific conditions are met.
- Search Processing Language (SPL): A powerful query language for extracting and analyzing data.
Splunk Enterprise Security (ES)
- Splunk Enterprise Security (ES): This is a specific product built on the Splunk platform that acts as a Security Information and Event Management (SIEM) system.
- Features: It provides pre-built use cases, dashboards, and analytics specifically for security monitoring, threat detection, and incident response.
- Analytics: Leverages analytics and machine learning for advanced threat detection capabilities.
Task Details:
 so, we need to Answer these questions based on our anlysis:
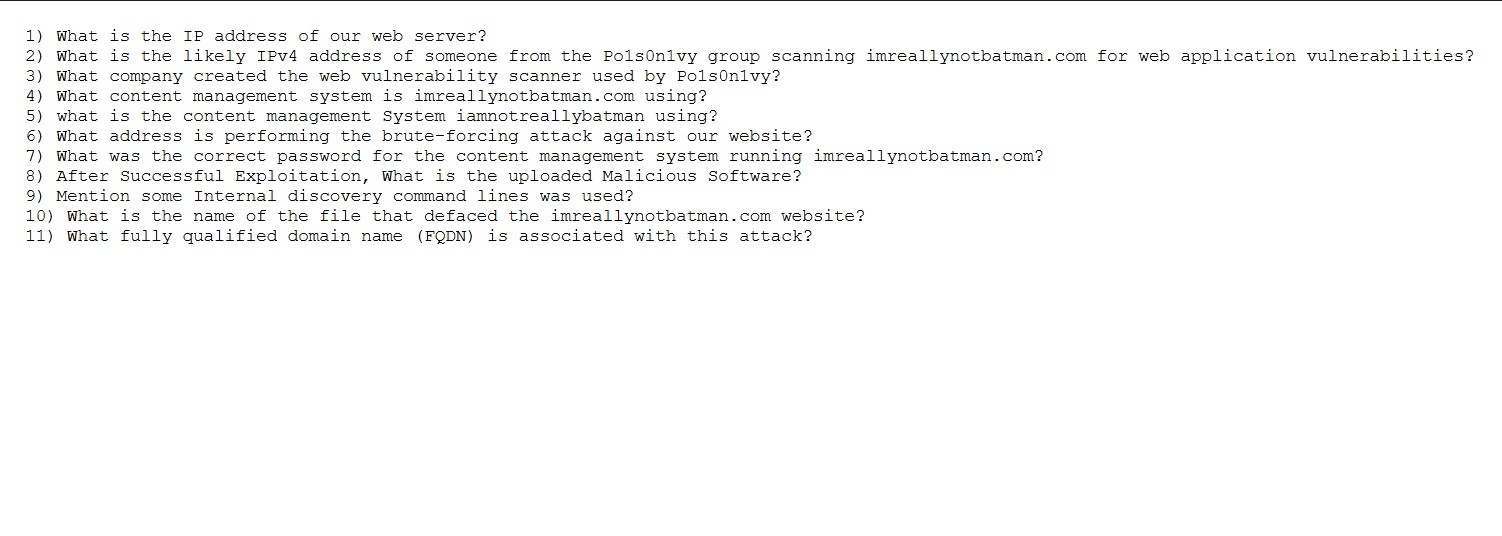
and you can visit the original task From here: Boss of the Soc Splunk usecases
- so lets dive into solution:
First, we need to know What is the IP address of our web server , We can find it by searching for index=botsv1 imreallynotbatman.com, then identifying the internal IP address that appears most frequently in the dest_ip field as we can see below the IP : 192.168.250.70 is the ip address of our web server 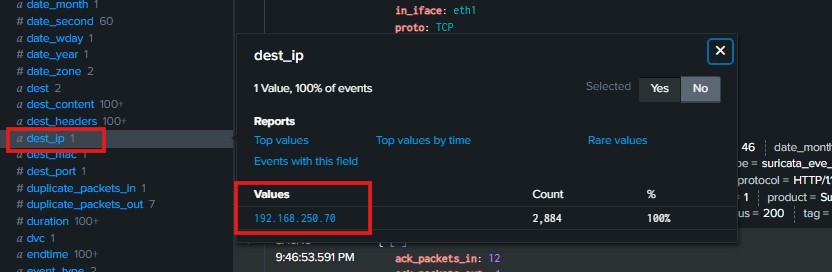
Then we need to know What is the likely IPv4 address of someone from the Po1s0n1vy group scanning imreallynotbatman.com for web application vulnerabilities?
We can find it by searching For index="botsv1" imreallynotbatman.com sourcetype"stream:http" dest_ip=192.168.250.70 Then we checked the source IPs and found two of them. We continued with the IP 40.80.148.42 because it has the highest number of connections to our server. This indicates that the APT group performed a web application scan, and this IP was the one used during the scanning activity as we can see below : 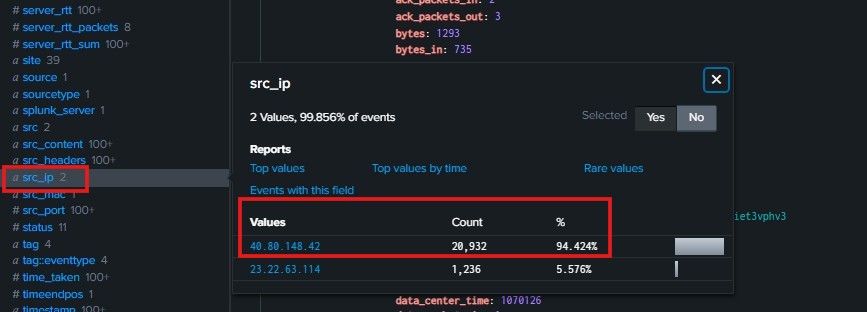
Then we need to Know What company created the web vulnerability scanner used by Po1s0n1vy
We can identify the vulnerability-scanning tool used by the attacker in the product section under the src_headers field of the logs sent from thesource IP 40.80.148.42 to our web server (dest_ip = 192.168.250.70). From this field, we can clearly see that the tool used is Acunetix
as we can see below : 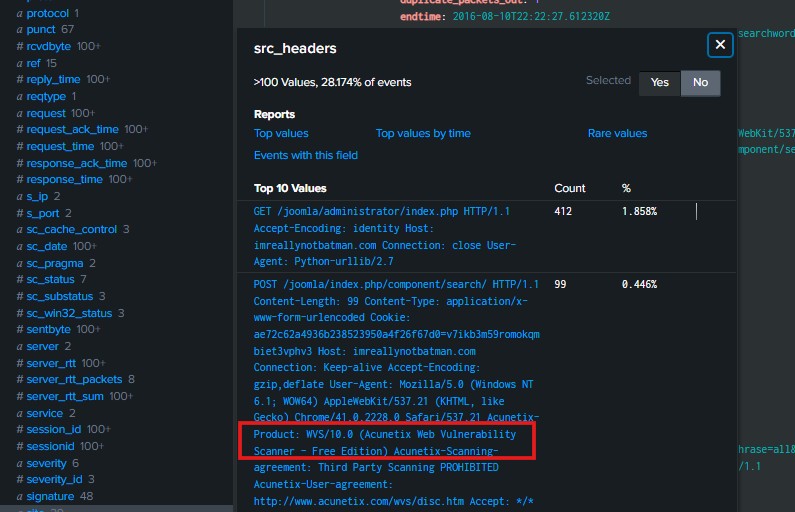
Then we need to know What content management system is imreallynotbatman.com using
We can find this information by searching for: index=botsv1 imreallynotbatman.com src_ip="40.80.148.42" dest_ip="192.168.250.70"
Then, by checking the URI field in the returned logs, we can see the keyword “Joomla”, which indicates that the attacker was targeting a Joomla-based web application You can further investigate Joomla to understand what components or vulnerabilities might have been probed during the scan so as we can see below : 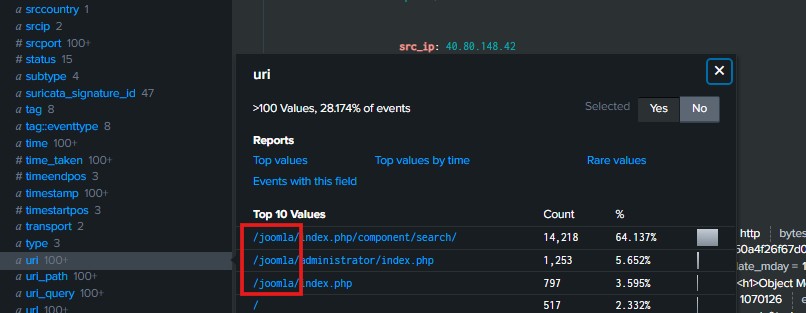

so, Joomla is the content management system .
Then we need to know What is the address performing the brute-forcing attack against our website we can search by index=botsv1 sourcetype=stream:http dest_ip="192.168.250.70" src_ip="23.22.63.114" http_method=POST and We previously identified two malicious IP addressesn , then we checked the form_data field to see which of the two IPs interacted with login forms.
We found no thing in form data associated with the IP 40.80.148.42 ,However, when examining the IP 23.22.63.114, we discovered that the form_data contains multiple login attempts using different passwords ,so This indicates a brute-force login attempt performed by this IP 23.22.63.114 against our web application as we can see below : 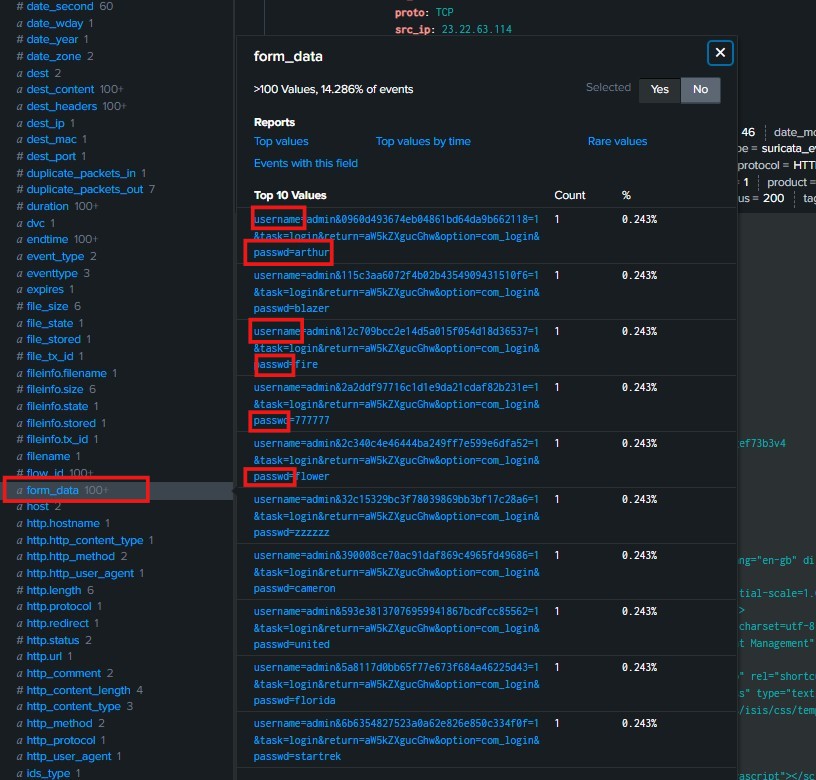
Then we need to know What was the correct password for the content management system running imreallynotbatman.com so , we can search by
index="botsv1" imreallynotbatman.com form_data=*username*passwd* dest_ip=192.168.250.70 | rex field = form_data "passwd=(?<userpassword>[^&]+)" | stats count by userpassword | sort - count
so the all passwords that the attacker used it in the brute-force login attempt will apear , so the correct password is batman Which has successfully login two times, because the attacker perform the attack from the IP 23.22.63.114 after he login successfully he tried to login again from the other ip 40.80.148.42 , so the batman is the only password that used two times , as we can see below : 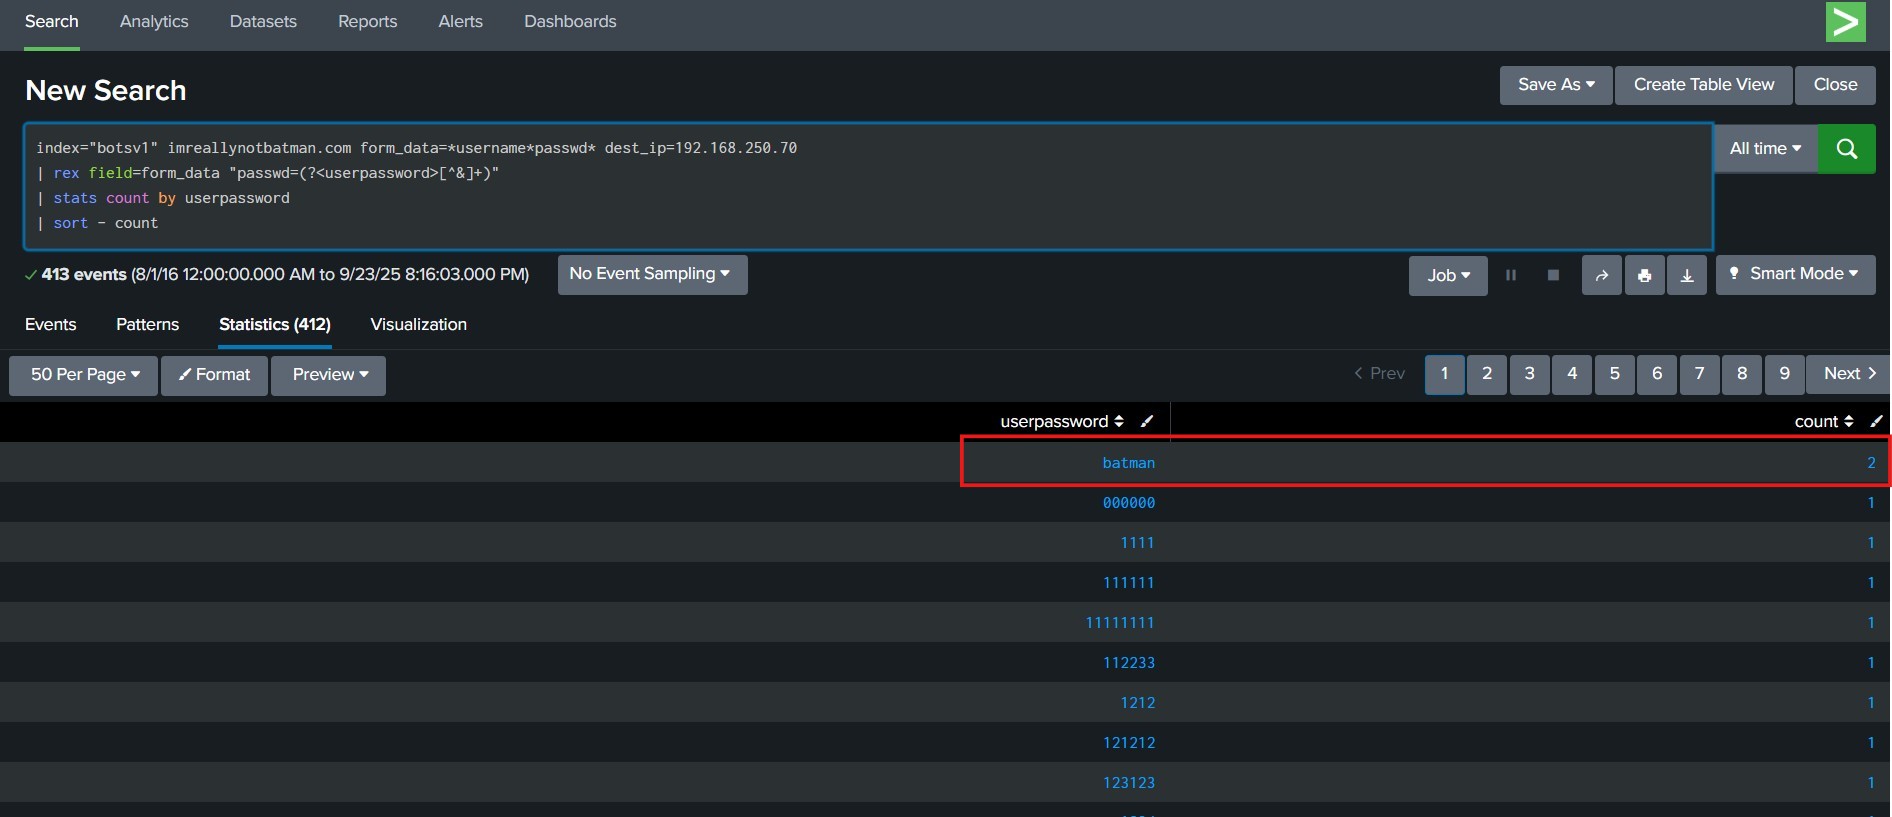
Then we need to know After Successful Exploitation, what is the uploaded Malicious Software ,so we can search by index=botsv1 sourcetype=stream:http dest_ip="192.168.250.70" http_method=POST multipart/form-data *.exe then we found the malicious file that named 3791.exe as we can see below : 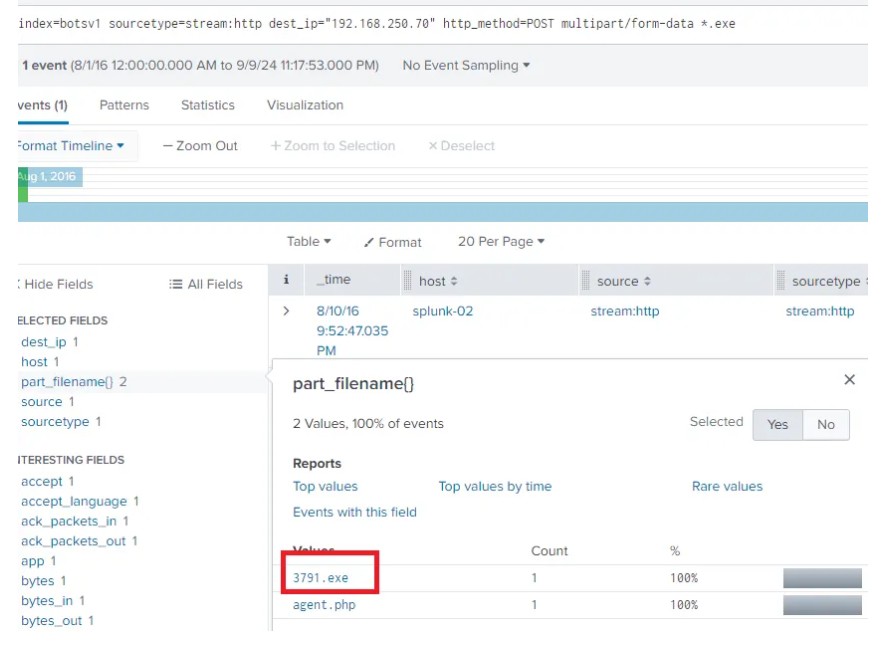
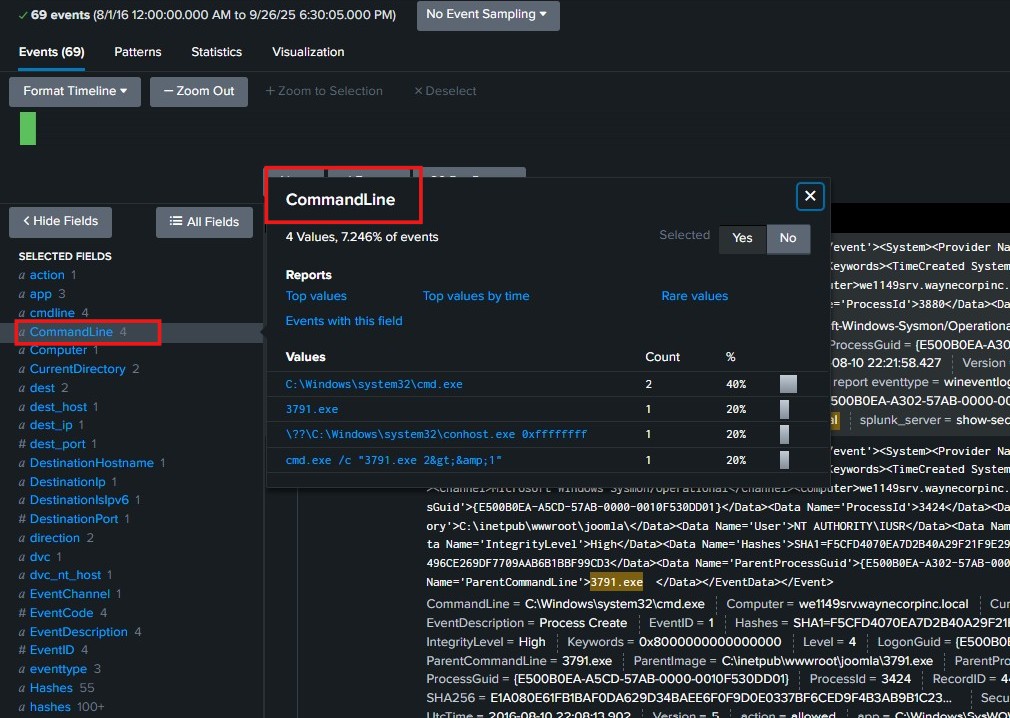
Then we need to know some Internal discovery command lines was used , we can use the same search index=botsv1 sourcetype=stream:http dest_ip="192.168.250.70" http_method=POST multipart/form-data *.exe and check the Command line field then you can find the commands as we can see below:
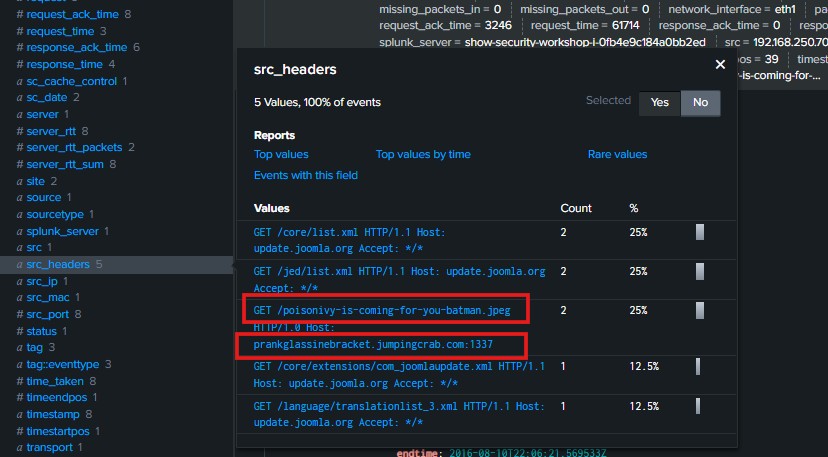
Then we need to Know What is the name of the file that defaced the imreallynotbatman.com website and What fully qualified domain name (FQDN) is associated with this attack
We can identify this by searching: index=botsv1 sourcetype=stream:http src_ip=192.168.250.70 Then, by checking the source headers (the outbound requests sent from the victim’s IP), we notice that most of the headers appear normal. However, one is abnormal:/poisonivy-is-coming-for-you-batman.jpeg ,so this is the file that defaced the imreallynotbatman.com website, because The filename includes the keyword “poisonivy”, which is commonly associated with a well-known remote access trojan (Poison Ivy RAT), This indicates that the infected machine attempted to connect to an unauthorized or malicious domain , suggesting possible malware communication or data exfiltration, so it is connecting to an unauthorized domain related to the attacker prankglassinebracket.jumpingcrab.com and this the fully qualified domain name (FQDN) is associated with this attack as we can see below :